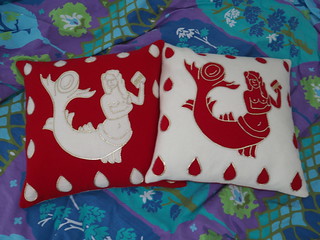
This was one of 2016-2017's secret projects - a pair of pillows in sewn intarsia.
This was initially conceived as a no-occasion gift for a dear friend, whose heraldry includes a red mermaid on a white background. The original design featured only the mermaid. However, when she was announced for the SCA's Order of the Pelican, it was a little too perfect. The mermaids had already been cut, and one sewn back together, but there was enough space to add the border of blood drops, and this gave me a firm deadline!
Intarsia, as pertains to sewing/embroidery, not knitting, is sort of like an un-backed applique. Instead of putting a design on a ground fabric, two identical designs are cut and exchanged, and then carefully stitched back into a solid piece with a whip stitch joining raw edges that are just butted together. The examples I know of are late medieval and Scandinavian, I'm not sure if it was more widely used than that - when I first saw them in Stockholm, I'd never heard of this before, and there don't seem to be many resources on it in English. Extant pieces seem to be home and church textiles, such as bedcoverings and cushions. The fabrics I used were red and cream/white wool flannels, I believe from Wm. Booth Draper, sewn with linen thread. The couched edging and details are ~2-2.5mm strips of "gold" goatskin leather, surprisingly cheap from Tandy's outlet store. The wool was all joined before I started the couching, so there are two layers of stitching everywhere that the leather is over a join. The backs of the pillows are in the opposite color wool, and it all encloses a feather pillow.
This was definitely a learning project; I jumped in hoping to figure it out as I went along. Although I did simplify the mermaid design, I could have gone further with that. Points and sharp corners really don't work well here! Sewing around raw edges is tricky, too close or too tight and you can pull the weave apart. In general, tighter weaves would be better. Finally, for drawing in my detail lines, I used my soapstone marker on the red (brushed off fine) and pink chalk on the white, which remained way too visible! In the end, I had to wash the whole panel. Yes, that's right, I stuck non-prewashed red and white wools, plus leather, in a sink full of water hoping to get pink spots out (not add more)! Everything turned out fine, but it was nerve-wracking.
10 August 2017
10 July 2017
A little something to tie you over
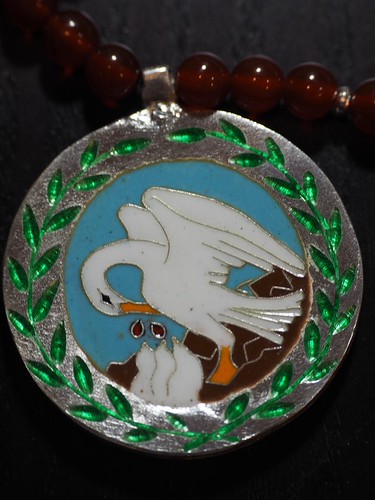
The secret projects are done! I even have pictures of some of them, I just need to get organized and find some time to write posts. This is a medallion I did for a dear friend - fine silver with cloisonne enamel. The outer wreath is engraved and filled, so it might be considered champleve.
24 March 2017
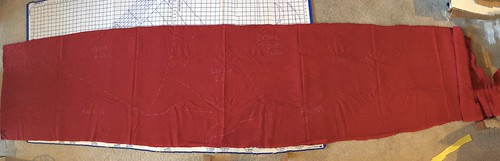
Burgundian gown pattern layout
I've been meaning to blog this forever: how I cut my Burgundian gowns. And since I was cutting a new one, I finally have a picture of my layout. Obviously, there's some distortion from creating the panoramic, but you can get the idea. My back panels are cut like a 4-panel supportive kirtle, with flared skirt. Laying them on the selvage leaves a large wedge between them that becomes the center back gore. The front panels are cut differently, with the selvage going all the way up the neckline to the shoulder. Like the back, the skirt is flared as much as fabric width allows. The leftover bit between the fronts is enough for sleeves, cuffs, and collar. How this works in practice, and why there's only one gore is this: the angling of the front pulls the fullness forward, draping in folds at center front with the side seams pulled forward from the normal vertical line. The big gore in the back then replaces all the fullness that the front is stealing, making it even. I think it works really well, and it's a fairly efficient layout.
I have several other projects I'm working on, including some exciting things, but they are !sssh~secret!, with a few months to go before unveiling.
I have several other projects I'm working on, including some exciting things, but they are !sssh~secret!, with a few months to go before unveiling.
17 January 2017
What was I doing in 2016?
As I alluded to earlier, there were some projects in 2016, despite the lack of blogging!
Sewing: aside from the brick stitch pouch, I made myself some basic, everyday wear. I made two more pirihan for my Persian wear - shirts were by far the limiting factor on how many days I could wear this style. I expanded my male clothing - a short tunic, two pairs of braies, and cheater hose. The braies and hose have elastic waistbands, and the hose just have stirrups instead of full feet. But they're comfortable and very practical. Finally, for my elevation I made a handsewn wool tunic for the vigil, and a white wrap dress to wear over my other clothes on my way into court.
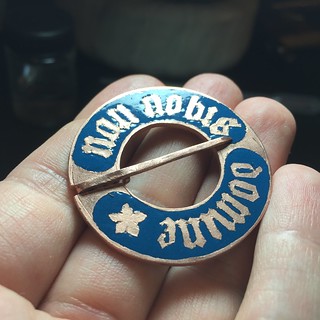
I've been continuing to expand my metal an enamel work. The annular pin here was started in 2015, but in 2016 I finished the engraving, applied the enamel, and did the finishing work. I have a stupid-large cloisonne medallion in progress. Finally, I engraved a plate for intaglio printing; these were my vigil tokens.
Sewing: aside from the brick stitch pouch, I made myself some basic, everyday wear. I made two more pirihan for my Persian wear - shirts were by far the limiting factor on how many days I could wear this style. I expanded my male clothing - a short tunic, two pairs of braies, and cheater hose. The braies and hose have elastic waistbands, and the hose just have stirrups instead of full feet. But they're comfortable and very practical. Finally, for my elevation I made a handsewn wool tunic for the vigil, and a white wrap dress to wear over my other clothes on my way into court.
I've been continuing to expand my metal an enamel work. The annular pin here was started in 2015, but in 2016 I finished the engraving, applied the enamel, and did the finishing work. I have a stupid-large cloisonne medallion in progress. Finally, I engraved a plate for intaglio printing; these were my vigil tokens.
14 January 2017
05 January 2017
Elsewhere in blog land
There have been some really good resources put out lately, these are a few that I recommend:
Fur primer at Cotte Simple. This overview includes a lot of different fur types, not just vair, ermine and gris, and has great images for examples and recognizing different types.
Women's Headwear 1480-1520 at Clothing the Low Countries. A subject near and dear to my heart!
Overview of 16th Century Dutch Women’s Clothing, also at Clothing the Low Countries. Although I'm not sure I'd ever want to wear the later styles, this is a good survey of Dutch women's fashion in the 1500s.
Subscribe to:
Posts (Atom)